uniapp中仿微信支付宝支付码功能
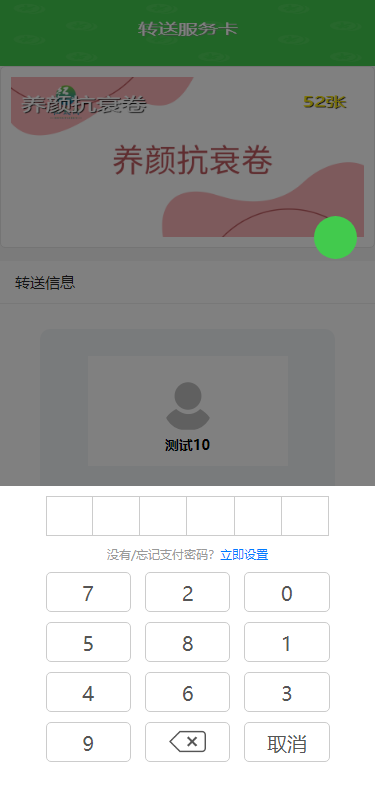
先上效果

为了方便,用组件的形式来实现,在components目录新建PayPass子目录,并新建PayPass.vue
<template>
  <view class="password-container">
	<view class="yin" @tap="onCancel"></view>
	<view class="mima">
		<view class="kuan">
			<view class="dian" v-for="(s, indexa) in 6" :key="indexa" :class="{'nob' : s > 1}">
				<text v-if="password.length >= s"> * </text>
				<text v-else></text>
			</view>
		</view>
		<view class="tips">
			没有/忘记支付密码?<text @tap="gotoPass">立即设置</text>
		</view>
		<view class="num">
			<view class="num-item" v-for="num in randomNumbers" @tap="onInput(num)">{{ num }}</view>
		    <view class="num-item qc" @tap="delNumber"></view>
			<view class="num-item" @tap="onCancel">取消</view>
		</view>
	</view>

	</view>
  </view>
</template>
<script>
export default {
data() {
return {
password : [],
numbers : [0,1,2,3,4,5,6,7,8,9],
i : 0,
};
},
computed: {
randomNumbers() {
const shuffledNumbers = this.numbers.slice();
for (let i = shuffledNumbers.length - 1; i > 0; i--) {
const j = Math.floor(Math.random() * (i + 1));
[shuffledNumbers[i], shuffledNumbers[j]] = [shuffledNumbers[j], shuffledNumbers[i]];
}
return shuffledNumbers;
}
},
created(){
uni.hideLoading();
},
methods: {
onConfirm() {
if (this.password) {
this.$emit('submit', this.password); // 触发自定义事件并传递密码
this.password = ''; // 清空输入
}
},
onCancel() {
this.$emit('cancel'); // 触发取消事件
this.password = ''; // 清空输入
},
gotoPass(){
this.onCancel();
uni.navigateTo({
url: '/pages/users/user_info/index',
});
},
onInput(num){
if ( this.password.length < 6 ){
this.password.push(num);
}
if ( this.password.length === 6 ){
console.log('提交数据', this.password);
uni.showLoading();
const mydata = {
...this.data,
paypass: this.password.join('')
};
console.log(mydata);
this.$emit('setPass', this.password.join(''));
this.$emit('submit');
this.timeDelPass();
}
},
delNumber(){
if(this.password.length > 0){
this.password.pop();
}
console.log(this.password)
},
timeDelPass(){
setTimeout(() => {
this.password = [];
}, 2000);
}
}
};
</script><style scoped>
.password-container{
padding: 20rpx;
.yin{
position: fixed;
z-index: 100;
width: 100%;
height: 100vh;
background: #000;
opacity: 0.5;
top:0;
left:0;
}
.mima{
position: fixed;
z-index: 101;
background: #fff;
width: 100%;
bottom: 0;
left:0;
padding: 20rpx 20rpx 80rpx 20rpx;
.tips{
text-align: center;
margin-top: 20rpx;
color: #999;
font-size: 24rpx;
text{
color: #007AFF;
}
}
.num{
display: flex;
flex-wrap: wrap;
justify-content: space-between;
align-items: center;
width: 80%;
margin: 20rpx auto auto auto;
.num-item{
width: 30%;
height: 80rpx;
text-align: center;
line-height: 80rpx;
font-size: 40rpx;
border: 1rpx solid #ccc;
margin-bottom: 20rpx;
border-radius: 10rpx;
color:#555;
}
.qc{
background: url('/static/images/ali/qc.png') no-repeat center center;
background-size: 45%;
}
}
.kuan{
display: flex;
justify-content: space-between;
align-items: center;
width: 80%;
margin: auto;
.dian{
width: 16.7%;
height: 80rpx;
border: 1rpx solid #ccc;
text-align: center;
display: flex;
justify-content: center;
align-items: center;
}
.nob{
border-left: none;
}
}
}
}
</style>使用,在需要使用支付密码的父组件中,先引入这个组件
<PayPass
   v-if="payPassWin"
   @cancel="closePayWin"
   @setPass="setPass"
   @submit="caxun"></PayPass>
import PayPass from '@/components/PayPass/PayPass.vue';

export default {
    components:{
	home,
	PayPass
    },
    data(){
       payPassWin : false,
       payPass : ''
    },
    methods: {
       closePayWin(){
	  this.payPassWin = false;
	  this.payPass = '';
       },

       setPass(e){ //获得输入的密码
	  this.payPass = e;
       }

       caxun(){

         console.log('继续提交数据');

       }

    }
}
